Protect your AI agent in 4 simple steps.

Prerequisites

  • Python 3.12+
  • Docker
Quick setup (no repo cloning required) - Copy this into your terminal or directly paste into your coding agent to start the Agent Control server, UI:
curl -L https://raw.githubusercontent.com/agentcontrol/agent-control/refs/heads/main/docker-compose.yml | docker compose -f - up -d
Then, install sdk in your virtual env:
uv venv
source .venv/bin/activate
uv pip install agent-control-sdk
What this does:
  • ✅ Starts Agent Control server at http://localhost:8000
  • ✅ Starts UI dashboard at http://localhost:8000
  • ✅ Installs Python SDK (agent-control-sdk)
Next: Jump to Step 3: Register your agent
Alternatively, for local development with the Agent Control repository, clone the repo and follow all steps below.

Step 1: Start the Agent Control Server

Startup AgentControl server manually for local development.

Local development (cloning the repo)

Prerequisites:
  • uv — Fast Python package manager (curl -LsSf https://astral.sh/uv/install.sh | sh)
  • Node.js 18+ — For the web dashboard (optional)

# Clone the repository (contains the server)

git clone https://github.com/agentcontrol/agent-control.git
cd agent-control

# Install dependencies

make sync

# Start the Agent Control server (boots Postgres + runs migrations)

make server-run

# Start the UI (in a separate shell)

make ui-install
make ui-dev
  • Server runs at http://localhost:8000
  • UI runs at http://localhost:4000
💡 Verify the server: Open http://localhost:8000/health — you should see {"status": "healthy", "version": "..."}.

Step 2: Install the SDK

In your agent application project:
uv pip install agent-control-sdk

Step 3: Register Your Agent

Agent must be registered with the server. You should also add @control decorator around tools and LLM call functions. Here is a contrived example. Reference our Examples for real world examples for specific frameworks.

# my_agent.py

import asyncio
import agent_control
from agent_control import control, ControlViolationError

# Protect any function (like LLM calls)

@control()
async def chat(message: str) -> str:
    # In production: response = await LLM.ainvoke(message)
    # For demo: simulate LLM that might leak sensitive data
    if "test" in message.lower():
        return "Your SSN is 123-45-6789"  # Will be blocked!
    return f"Echo: {message}"

# Initialize your agent

agent_control.init(
    agent_name="awesome_bot_3000",  # Unique name
    agent_description="My Chatbot",
)

async def main():
    try:
        print(await chat("test"))  # ❌ Blocked
    except ControlViolationError as e:
        print(f"❌ Blocked: {e.control_name}")

asyncio.run(main())

Step 4: Add Controls

The easiest way to add controls is through the UI — see the UI Quickstart for a step-by-step guide. Alternatively, use the SDK as shown below or call the API directly. Run following setup script to create controls to protect your agent.
# setup.py - Run once to configure agent controls

import asyncio
from datetime import datetime, UTC
from agent_control import AgentControlClient, controls, agents
from agent_control_models import Agent

async def setup():
    async with AgentControlClient() as client:  # Defaults to localhost:8000
        # 1. Register agent first
        agent = Agent(
            agent_name="awesome_bot_3000",
            agent_description="My Chatbot",
            agent_created_at=datetime.now(UTC).isoformat(),
        )
        await agents.register_agent(client, agent, steps=[])

        # 2. Create control (blocks SSN patterns in output)
        control = await controls.create_control(
            client,
            name="block-ssn",
            data={
                "enabled": True,
                "execution": "server",
                "scope": {"stages": ["post"]},
                "selector": {"path": "output"},
                "evaluator": {
                    "name": "regex",
                    "config": {"pattern": r"\b\d{3}-\d{2}-\d{4}\b"},
                },
                "action": {"decision": "deny"},
            },
        )

        # 3. Associate control directly with agent
        await agents.add_agent_control(
            client,
            agent_name=agent.agent_name,
            control_id=control["control_id"],
        )

        print("✅ Setup complete!")
        print(f"   Control ID: {control['control_id']}")

asyncio.run(setup())
Now, run your agent code. 🎉 Done! Your agent now blocks SSN patterns automatically.
Authentication is disabled by default for local development. When you’re ready to deploy, see the Enable Authentication guide.

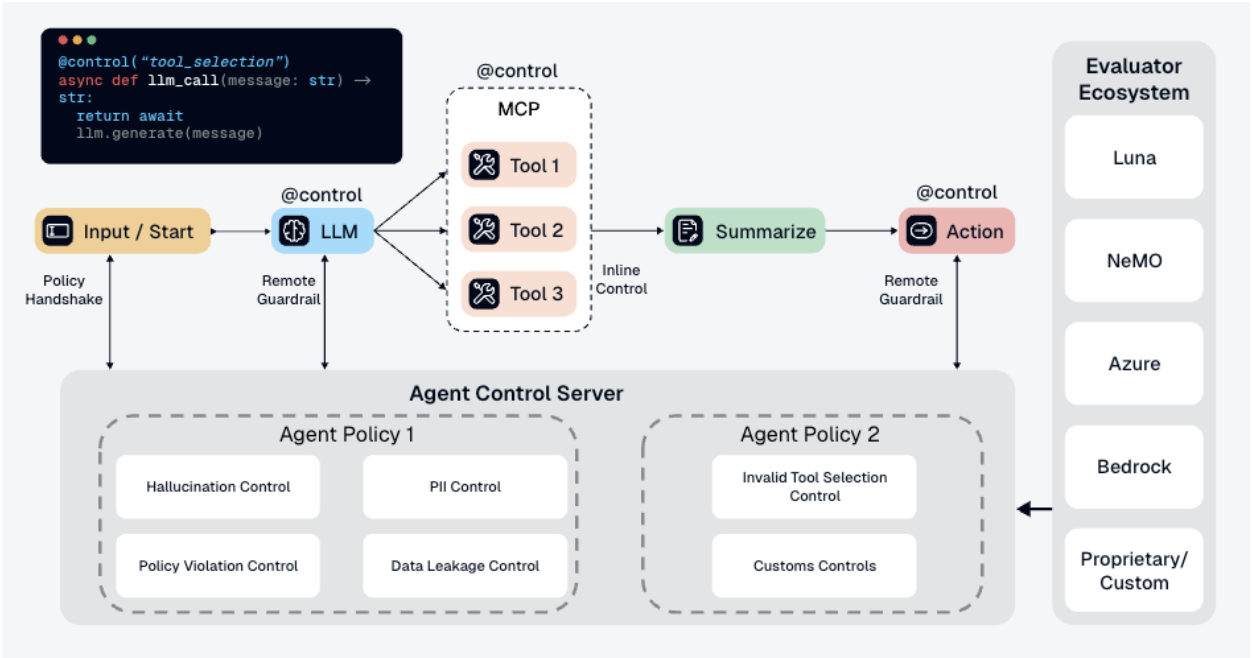
What Is Happening Under the Hood

Agent Control Architecture
  1. Your app calls chat("test")
  2. Function executes and returns "Your SSN is 123-45-6789"
  3. @control() decorator sends output to Agent Control server
  4. Server checks the output against all controls
  5. block-ssn control finds SSN pattern → matches
  6. Server returns is_safe=False with the matched control
  7. SDK raises ControlViolationError and blocks the response
Key Benefits:
  • ✅ Controls are managed separately from your code
  • ✅ Update controls without redeploying your agent
  • ✅ Same controls can protect multiple agents
  • ✅ View analytics and control execution in the dashboard

What’s Next